Asana - Week 5
The videos below are only for your reference. You need to listen to your own body, and adjust the speed and depth of the practice accordingly.
The practices are to be done in the order given below.
If you only do practices in bold, the sequence should take approximately 25 minutes. The whole sequence takes approximately 45 minutes.
All practices in sequence: click here to access playlist

Namaskarasana (salutation pose)
Practise 7-10 rounds. Breathe in, lift the head, and breathe in when in the starting position. Breathe out as you bring your head between your arms, lean forward, and bring the knees together.
IMPORTANT: Make sure your position is stable: either place your feet flat on the floor or, if need be, roll a blanket under your heels.

Kashtha Takshanasana (chopping wood)
Practise 7-10 rounds. Breathe in deeply through the nose as you lift the head, and hold the breath for 1-2 seconds as the tension in back and shoulders intensifies. Breathe out forcefully trough the mouth as you swing both arms downwards. For an added stress-release effect, produce a loud “HA” sound at the end of the exhalation.
IMPORTANT: Precautions as for Namaskarasana above. Additionally, take care not to hit the floor on the downward movement of the arms so you don’t hurt your hands.
If this practice is not suitable for you due to the squat, you can do it standing up as shown in the second part of the video.

Vayu Nishkasana (wind-releasing pose)
Practise 7-10 rounds. Breathe in deeply through the nose as you lift the head, and hold the breath for 1-2 seconds. Then exhale as you lift the buttocks and straighten your legs, with the aim not to move the shoulders from their pivoting position. However, move the shoulders up and down as needed until flexibility in the hamstrings develops with practice.
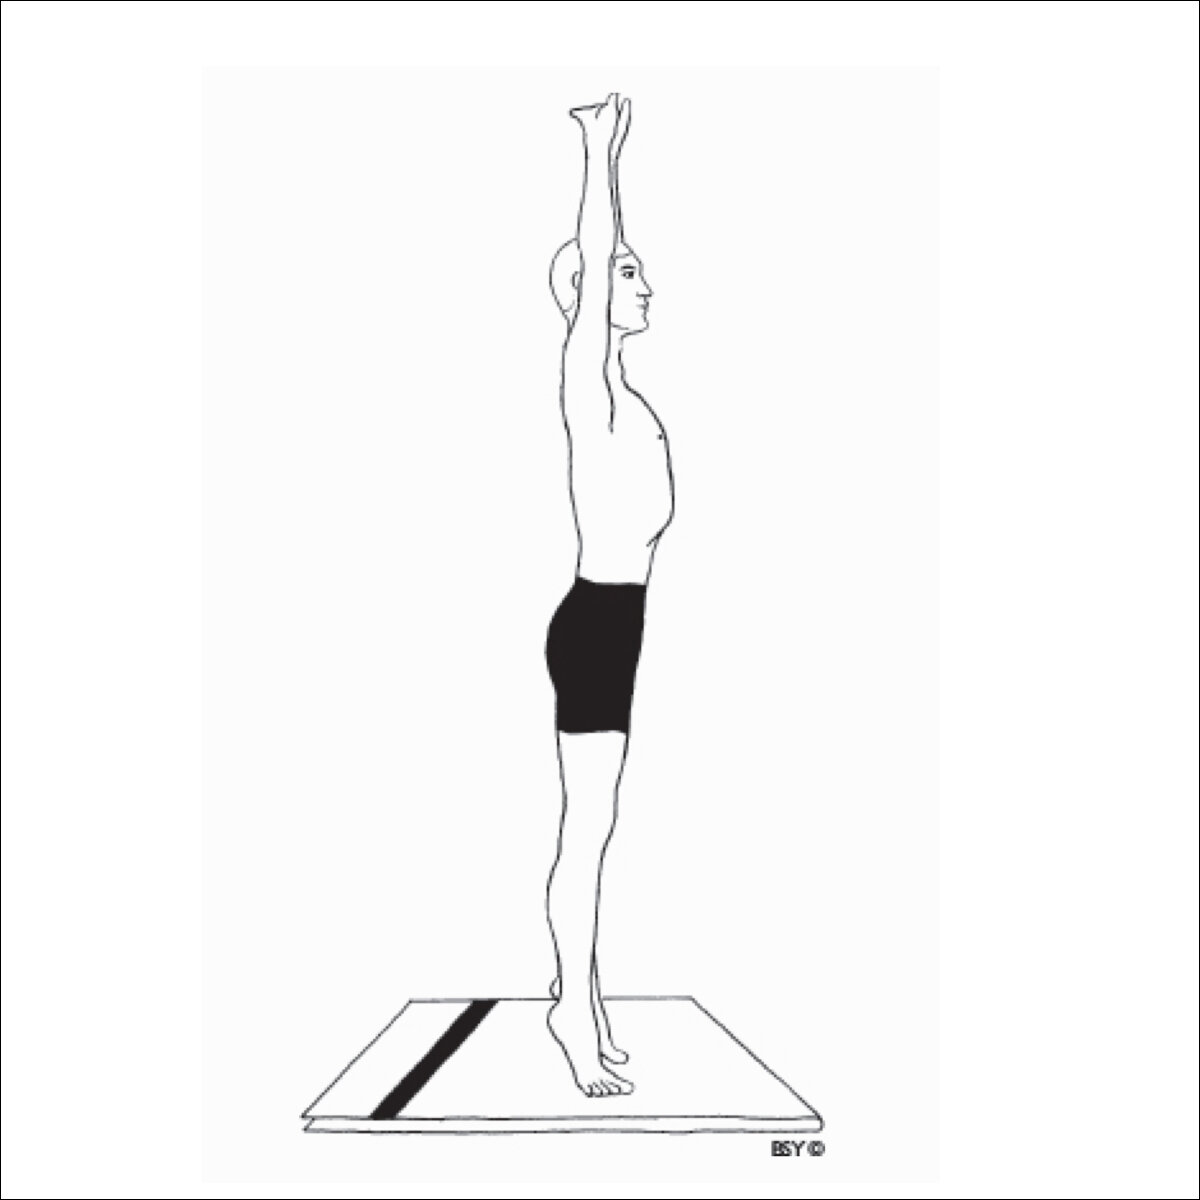
Tadasana (palm tree pose)
Practise 10 rounds.
Breathe deeply in on the way up, breathe out on the way down.
Do each movement slowly and with control, developing balance gradually.
Fix your gaze on a point ahead of you to help you maintain balance.
Coordinate the movement of the heels and hands; synchronise both with the movement of the breath.
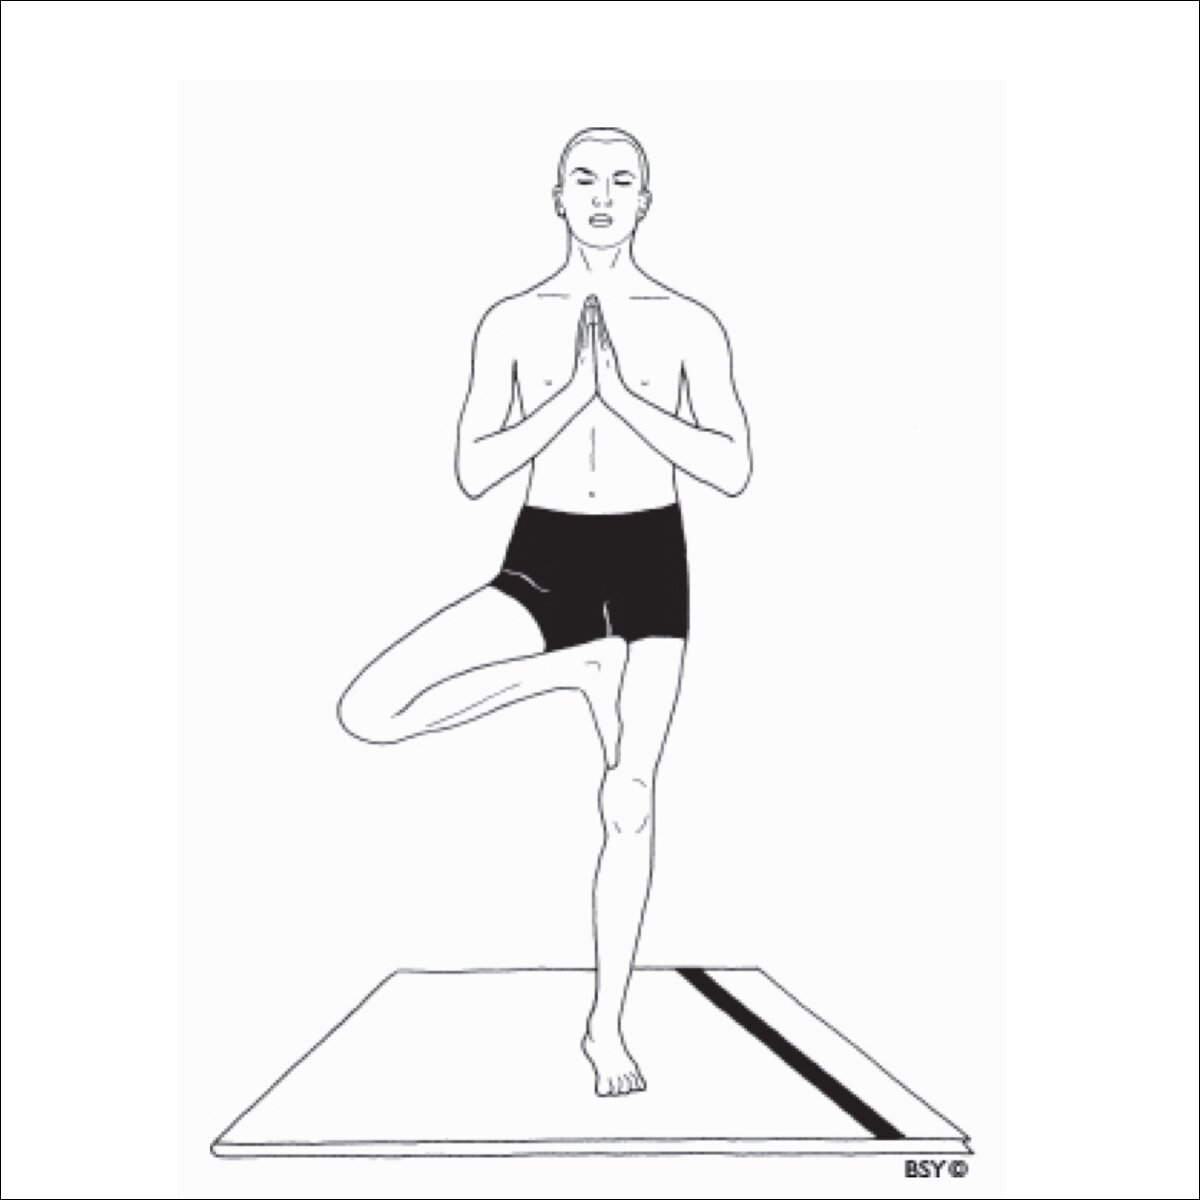
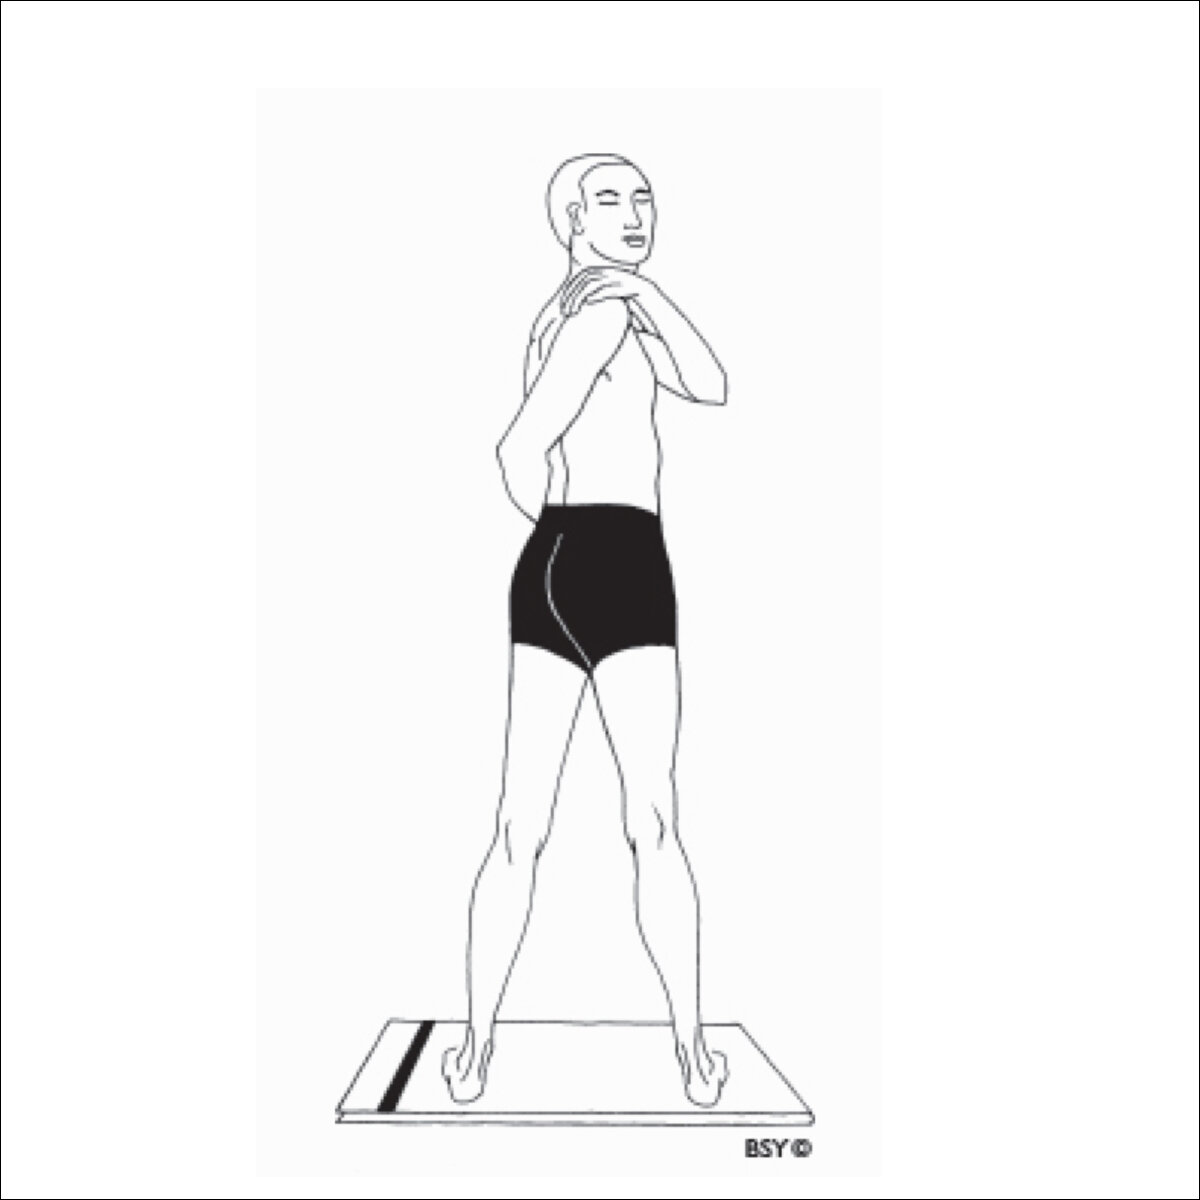
Eka Pada Pranamasana (one-legged prayer pose)
Practise up to two rounds on each leg.
Make sure the raised foot is either above or below the knee, not pressing against the knee.
Find balance when you transfer the weight of your body on one leg, before you raise the foot, and also find a point to gaze upon during the practice at this time. Then, try to remain in that balanced state as you lift the leg and then maintain the posture.
Develop balance through a steady gaze and mental focus, rather than by tightening muscles in the body.
Breathe normally all throughout.
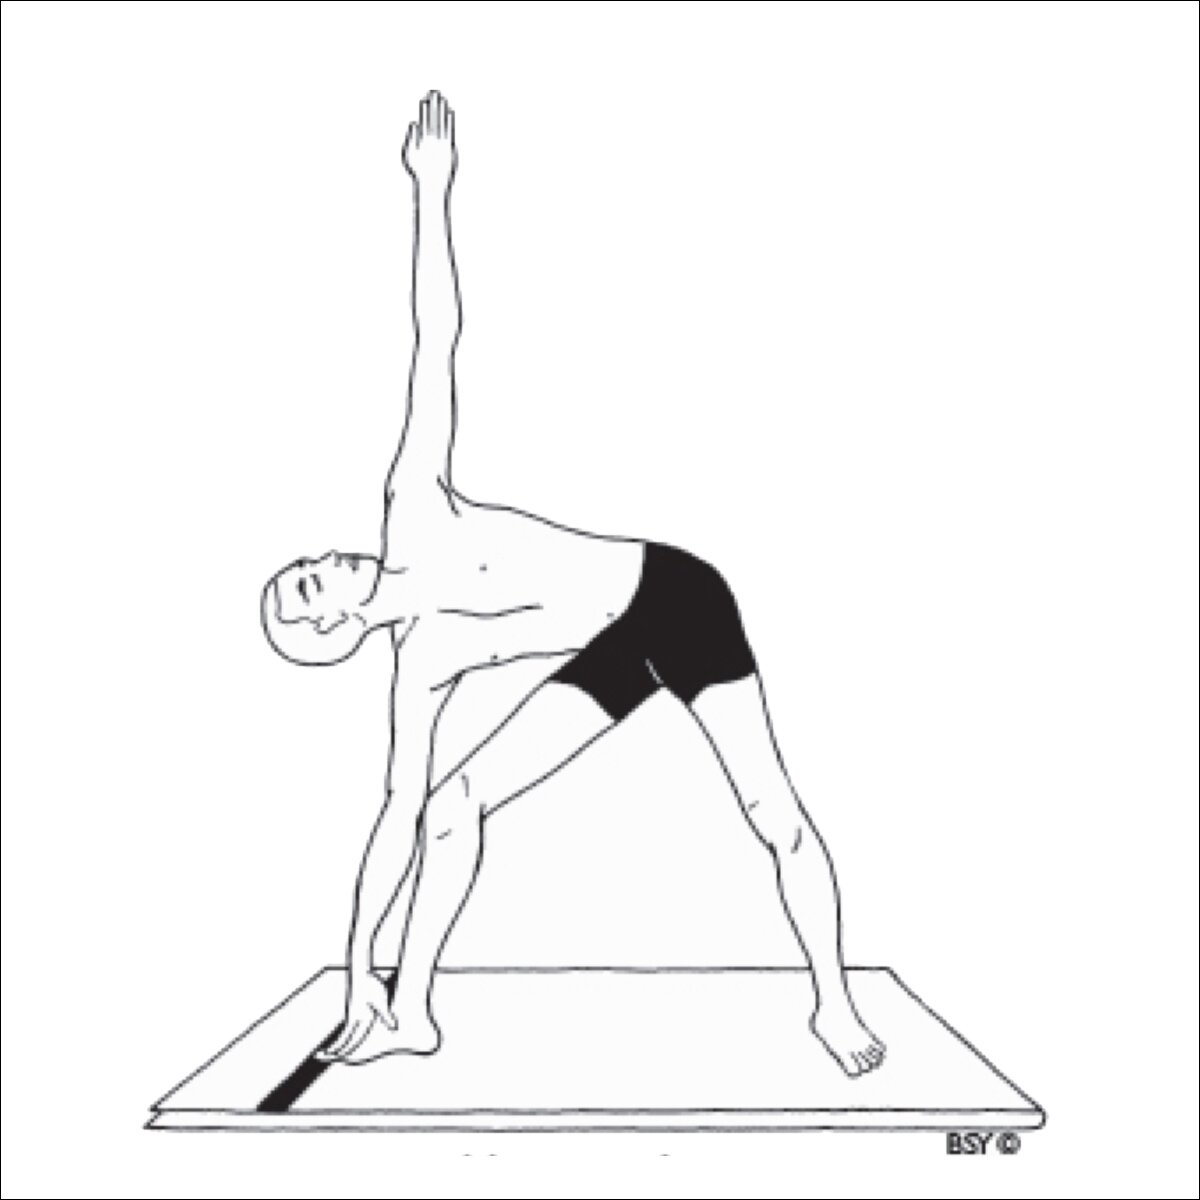
Trikonasana, Variation 1 (triangle pose)
Practise up to 7 rounds to each side.
Breathe in when in the starting position. Exhale when bending to each side.
Keep the palms facing forward at all times.
First practise with the eyes open to make sure you’re not twisting.
Then, close your eyes and feel the movement from within.
Squeeze the abdominal muscles when bending to the side, and when coming back up, to protect the lower back and to allow deeper sideways movement.
When coming up into the starting position, first straighten the leg, then bring the body up.
Practice notes:
1. Do not try to reach the floor with your hand. This is not at all important, and, if you try to do it before your flexibility allows you to do so, it will be counterproductive as you will be led to bend forward rather than just doing the sideways stretch, which is what we’re looking for.
2. You can use the elbow/ forearm to gently push against the knee to make sure there’s no bending forward
3. Never bend the leg so that the knee is over the ankle. Always keep the knee behind the ankle. If this means your movement downwards is limited, try separating the feet a little further.
4. The more the feet are separated from each other, the easier it will be to come down. Make sure you have enough grip so you don’t lose balance.

Eka Padasana (one-foot pose)
Practise up to five rounds on each leg.
Try to bring the whole upper body - in line with the raised leg - towards a horizontal position, but only bend forward as far as you can without having to break that alignment.
Breathe deeply on the way down and up, and normally while you’re holding.
Activate the abdominal muscles (by tightening them deliberately) while holding; use all the big muscles in the back, including the glutei (buttocks) and abdomen, preventing any strain in the neck.

Trikonasana, Variation 3 (triangle pose)
Practise up to 10 rounds to each side.
Breathe in when in the starting position. Exhale when bending to each side.
Slide each hand to its maximum comfortable position, so that the shoulder stretches at the same time as the opposite side is being stretched downwards..
First practise with the eyes open to make sure you’re not twisting.
Then, close your eyes and feel the movement from within.
Precautions: like for Trikonasana Variation 1 above.
Kati Chakrasana (waist rotating pose)
Practise 10 rounds to each side.
Breathe in when coming into the starting position. Exhale when twisting to each side.
First practise with the eyes open to make sure your waist and hips stay facing forward.
Then, close your eyes and feel the movement from within.
Lead the movement with your chin and keep the head upright.
Turn the head fully, to give the whole spine an even movement, from the base to the top.

Dolasana (pendulum pose)
Practise up to 5 rounds on each side.
Breathe in in the starting position. Exhale as you bend forward and sideways.
Important: bend from the hips, not the waist, and lead the movement with the chest, not with the head.
Keep the breath out as you move your head to the opposite knee, and then back to the original knee.
Inhale when raising the trunk back up.

Ardha Shalabhasana (half-locust)
Practise up to 10 rounds.
Practice note: it is best to counterbalance this asana by spending some time in shashankasana, the child’s pose, before moving on to other practices.

Sarpasana (snake pose)
Practise up to 5 rounds if retaining breath; up to 7 rounds if breathing in while raising the body
Breathe in when in the starting position. Retain breath when raising the body up.
If you feel too much pressure in the head when retaining breath, try lifting the body up while inhaling, instead.
Practice note: See what works better for you: first raising the arms up, then the body - or lifting both at the same time. Use the lower back muscles and buttocks to lift up, and make sure to relax all effort every time you come back to the starting position. Do not strain over your limits.

Surya Namaskara Preparation 1
Practise 3 - 5 rounds.
Spend some time in each posture, breathing normally.
Practice notes:
1. In Ashwa Sanchalana (where the foot is between the hands and head looking up), make sure you’re not bringing the knee over the toes. To achieve a slight backward bend, puch the pelvis down, trying not to twist the body to the side of the outstretched leg.
2. In the mountain pose, focus on gently pushing the heels towards the floor. Important: if you feel that this pose is not suitable for you due to weakness in the shoulders, skip it.
3. In ashtanga namaskara (where chest and chin are on the floor), try to keep the buttocks up as they were in the starting position (cat pose). If this is quite difficult for you to achieve right now, bring the hands further away from the body and leave them there for the subsequent cobra pose, too.
4. In the cobra, make sure the hips come in contact with the floor, and keep them on the floor while raising the trunk into the cobra pose. If this feels too strenuous to hold in the arms, bring the hands further away from the body, but don’t try to compensate for weakness in the arms by straightening the elbows and therefore lifting the hips off the floor. This is important.
Also, keep the toes tucked under in this version of the practice.

Surya Namaskara Preparation 2
Practise 3 - 5 rounds.
Spend some time in each posture, breathing normally. Inhale when going into the backward bend, exhale when bending forward.
Practice notes:
1. In Hasta Utthanasana (the standing backward bend), feel that the whole spine is engaged from the tailbone to the top of the neck. Do not try to force a strong backward bend here, or bend the knees.
2. IMPORTANT: when you bend forward, keep the back straight, stretching the hamstrings. Never try to reach the floor with your hands by bending in the lower back. If your hands do not reach the floor from an almost straight-back position, bend your knees accordingly. The video provided shows three progressively easier ways to both come into the forward bend and then lifting yourself up again.
THERE SHOULD BE NO STRAIN IN YOUR LOWER BACK when doing this sequence. It is important to assume this habit for the future practice of Surya Namaskara.
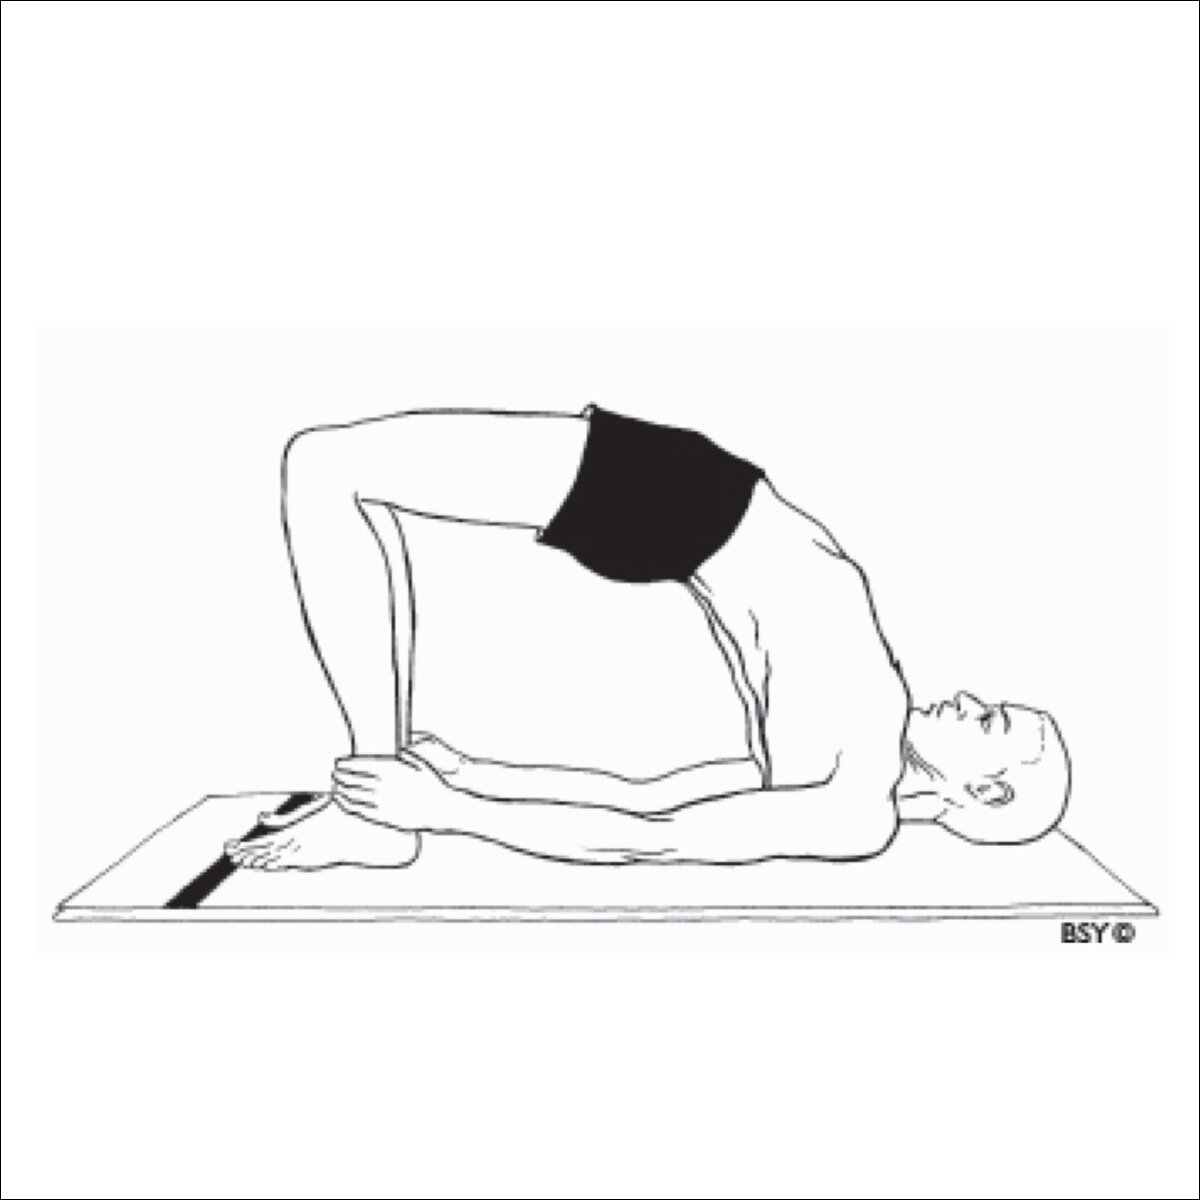
Kandharasana
Practise up to 5 rounds.
Breathe in when in the starting position, then retain breath inside while raising the abdomen upwards, and while staying in the final position.
If you feel too much pressure in your head if breathing like this, then instead of retaining breath, breathe in as you raise the body up, and breathe normally in the final position, staying there only for as long as is appropriate for you on any given day.
Breathe out as you lower the body back down.
Lead the movement with the navel.
Practice note: When holding the ankles during this practice, it will become stronger, in that you will be able to lift the body higher. Make sure you stay safe!
Additionally, it is not possible for everyone to easily get hold of the ankles in the starting position. This will depend on the length of your arms compared to the rest of your body. Therefore, only do so if it can be done with complete ease. Otherwise, place your palms flat on the floor instead.
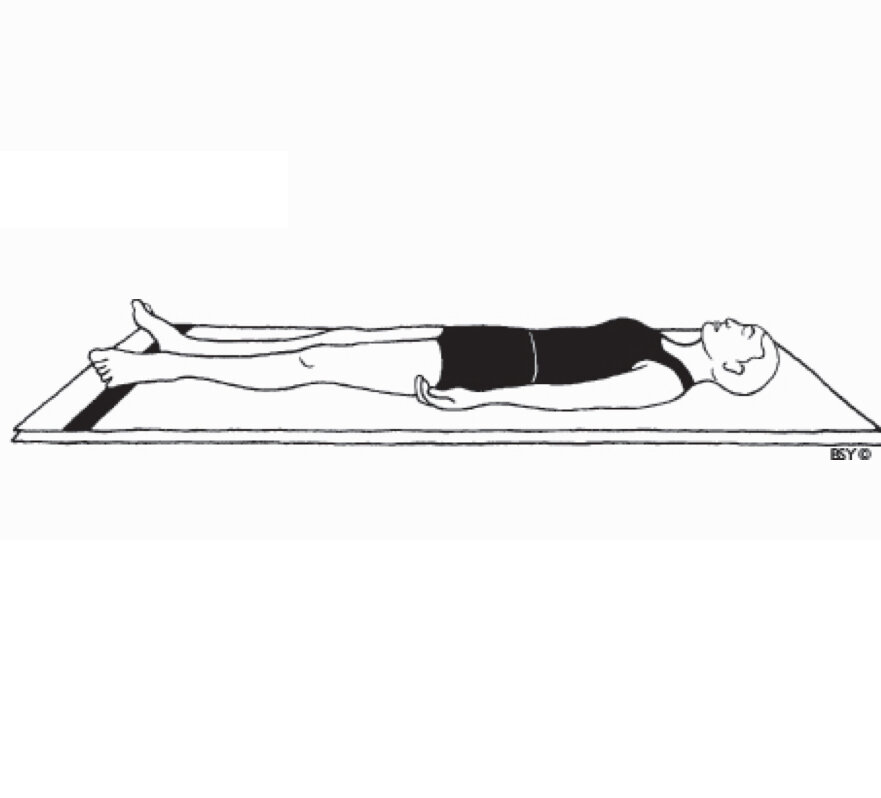
Shavasana (corpse pose)
Practise for at least 5 minutes after your asana programme.